Removing a Microsoft account from Windows 11 can be necessary for various reasons, such as changing ownership of a device, switching to a different account, or resolving issues with the current account. Windows 11, with its integrated Microsoft services, makes managing user accounts straightforward but may require specific steps to remove an account entirely. Understanding these steps is crucial for maintaining the security and privacy of your personal information.

The process of removing a Microsoft account from Windows 11 involves navigating through the system settings to access the account management options. Users must ensure that they have administrative privileges to make these changes. Additionally, it’s important to consider the implications of removing an account, such as the loss of personalized settings, saved passwords, and synchronization features associated with the Microsoft ecosystem.
To remove a Microsoft account from your Windows 11 device, you will need to switch to a local account or another Microsoft account if it is the only one registered. The steps include accessing the Settings app, navigating to the “Accounts” section, and following the prompts to remove the desired account. This guide will provide a comprehensive walkthrough to help you safely and effectively remove a Microsoft account from Windows 11, ensuring a smooth transition and preserving your data integrity.
How To Remove Microsoft Account From Windows 11?\
Switching from a Microsoft account to a local (offline) login on your Windows 11 device is a crucial step in the process of removing a Microsoft account. It is important to note that while this change provides certain advantages, such as no longer needing internet connectivity for sign-ins and allowing for distinct experiences across multiple PCs, it also means forfeiting features like automatic file and settings synchronization. If you are prepared for these changes, follow the detailed steps below to switch to a local account:
Step 1: Open the Settings App
Click on the Start menu and select the Settings app, represented by a gear icon, to open it.
Step 2: Navigate to Accounts
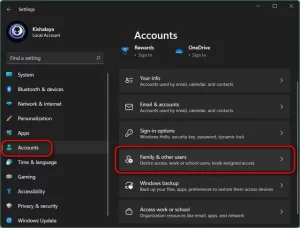
In the Settings app, look at the left side pane and select “Accounts.” This will open the accounts management section where you can view and adjust settings related to user accounts on your device.
Step 3: Access Your Info
Scroll down through the Accounts menu and choose the “Your info” option. This section contains information about your current account and options to manage it.

Step 4: Initiate Switch to Local Account
Under the “Account settings” section, you will find an option labeled “Sign in with a local account instead.” Click on this option to begin the process of switching from your Microsoft account to a local account.
Visual Guidance
1. Select “Accounts”: This step is part of accessing the relevant settings in the Settings app.
2. Choose “Your info”: Navigate within the Accounts settings to find detailed information about your user account.
3. Click “Sign in with a local account instead”: This crucial step initiates the transition to a local account.
Step 5: Follow the Prompts
The system will prompt you to confirm your decision to switch to a local account. This may involve verifying your identity by entering your current PIN or password. Follow these prompts carefully.
Read Also:- Key Quotes from Satya Nadella’s Microsoft Ignite 2023 Keynote
Step 6: Set Up Local Account
You will need to fill in the fields for your new local account. This includes setting a username and a password. Although you can leave the password fields blank to skip the sign-in requirement, it is highly recommended to set a password to protect your account from theft or hacking.
Step 7: Complete the Transition
Click “Next” to proceed with the setup. After verifying your details, select “Sign out and Finish” to finalize the switch to your new local account. Your device will now sign you out of your Microsoft account and sign in using the local account.

To completely remove a Microsoft account from Windows 11, there are additional steps beyond switching to a local account. This involves scrubbing the Microsoft account from the Accounts section of the Settings app. Follow these detailed instructions to ensure the Microsoft account is entirely removed from your device:
Step 1: Open Settings and Navigate to Accounts
Click on the Start menu and select the Settings app to open it.
In the Settings app, select “Accounts” from the left side pane to access the accounts management section.
Step 2: Remove the Microsoft Account
1. Choose “Email and accounts” from the Accounts menu. This section lists all email accounts associated with your device.
2. Locate your Microsoft account, identifiable via a Microsoft logo next to the account name, or click the downward arrow next to the account to expand its details.
3. Click the “Remove” button to initiate the removal process of the Microsoft account.
4. Confirm your decision by clicking “Yes” when prompted. This will remove the Microsoft account from your device.
Visual Guidance
1. Choose “Email and accounts”: Navigate to this section within Accounts to find all associated email accounts.
2. Select your Microsoft account: Identify and select the Microsoft account you wish to remove.
3. Click “Remove”: Click this button to remove the account from your device.
Step 3: Handling Secondary Microsoft Accounts
1. If you have secondary Microsoft accounts that need removal, you can manage these from different sections within Accounts.
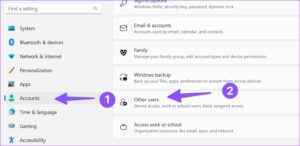
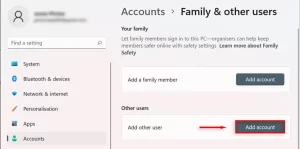
2. Go to “Accounts > Family and other users” for family accounts, “Accounts > Other users” for additional user accounts, or “Accounts > Access work or school” for work-related accounts.
3. Follow the same steps above to select and remove these secondary Microsoft accounts. Note that you won’t be able to remove the primary Microsoft account until you have switched your login to a local account.
Conclusion
Removing a Microsoft account from Windows 11 involves a few crucial steps to ensure that the account is completely detached from your device. By first switching to a local account, you eliminate the need for a Microsoft login and its associated sync features. Following this, scrubbing the account from the Email and Accounts section in the Settings app ensures it is no longer linked to your system.
Additionally, managing and removing any secondary Microsoft accounts through relevant sections like Family and Other Users or Access Work or School helps maintain a clean and organized account setup. This comprehensive process not only enhances your privacy but also provides greater flexibility and control over your Windows 11 experience.
